Add 3D assets to your Website easily with model-viewer
Adding 3D elements to your website sounds daunting, requiring highly creative thinking and potentially adding layers of difficulty to your workload. Typically, you would need to understand something like Three.JS along with GLSL to create the viewer and the scene in WebGL, maybe Blender for creating the asset, and then a bundler to secure the codebase ready for deployment.
This is a lot....and maybe you don't have the time to invest in learning all that, or the budget to employ someone who does.
But with Model Viewer, the Open-source, easy-to-implement, and well-optimised HTML Web component 🎇🎇, we can add these elements and create some excellent wow factor to your site.
Enter <model-viewer>
Just look at how smooth this operates in my browser (Google Chrome):

Source: Gif recording of the example on https://modelviewer.dev/
It's been over two years, and I'm still telling people about this awesome web component. Used it first in a Hackathon for Breast Cancer to showcase human anatomy. The brief we wanted to accomplish was bridging the gap of breast cancer and technology using current 3D tech available. 3D in the browser was not a new thing, but it was emerging, and we wanted to show that in our project.
Fun fact, it was the first time meeting Kera Cudmore as we were on the same team together. Time really does fly! 🤜
But what I'm really raving about, is how ridiculously easy it is to actually get this working.
- Have a 3D asset with an applicable file type (gltf / glb etc)
- Import the Web Component,
<model-viewer>using the script module import in your HTML. (Yes, HTML) - Use the
<model-viewer>element in your HTML like any other HTML element.
And that's it. Well not exactly, but that is the basis for everything, you still need to save the 3D asset in your file directory, and then link it in the src attribute of the web component.
<model-viewer
    auto-rotate
    loading="eager"
    field-of-view="30deg"
    alt="meaningful alternative text"
    src="3dAsset.gltf">
</model-viewer>
👆 Such a handy little snippet of HTML, and all because we imported the web component into the page for use. This code, will show a viewer element, where the user can zoom, pan, and move through 3D space with mouse/touch gestures. Awesome 👏!
By the way, did I mention this can just be deployed to Github Pages or Vercel without the need to bundle your codebase? Well you can!
Want to see it in action? Check out these projects where I got to use it as part of the development:
- Bust It: Cancer without Borders - Breast Cancer awareness Hackathon project 2021 highlighting Transgender Communities. Utilises Model-Viewer to show 3D human anatomy forms.
- Save Earth - Earth Day 2022 Hackathon project. Utilises Model-Viewer to enable interactive planet scaling of Earth and Mars...and a Death Star!
- ZTM Canvaz Hacktoberfest 2021 - Hacktoberfest submission 2021 to the Zero to Mastery Community Project. Utilises Model-Viewer to switch between different GLTF 3D models in a viewer.
Where to find assets:
I did promise I would show you where to get the assets from. Find an asset you like, download it in gltf/glb for example, and then link it via the src attribute of your Model-viewer element in HTML.
- Market - Lots and lots of free Models/Textures/HDRIs
- Sketchfab - Over 800K models available under Creative Commons licensing, from hi-res to low-poly
- Smithsonian - Educational website offering open access to GLTF models
There is plenty more available, you might just need to do a bit of digging, and of course please be mindful when downloading files from sources you may not have complete faith in. 🔐
Documentation
<model-viewer> has an incredible team of people behind it. It is a Google project, open-source, and the documentation and examples of using it are excellent.
The website has some excellent getting-started steps, and the documentation for use cases of the web component are expertly crafted. The Quick Start guide is located on the homepage of the site itself...no fuss, no mess.
The web component itself uses Three.JS under the hood for rendering, and is now a Google hosted library. And of course it's free and easy to implement, as easy as just adding the Script link to the HTML file linked to the CDN source!
Try it out with a starter project?
Let's quickly bash something up together. How about looking at a Cut chibi dog on a webpage, complete with deployment?
Follow these steps 🚶♀️🚶♂️:
- Let's start by getting the Dog GLTF Model shall we? Go to Market and download the model of this Dog.🐶
- Open up your favorite editor, in my case I'm using vsCode and create a new project.
- Put the
model.gltffile in the file directory of your newly created project. It most likely went to your "Downloads" folder, so you can just drag it across or cut/paste etc.✂ - Create an
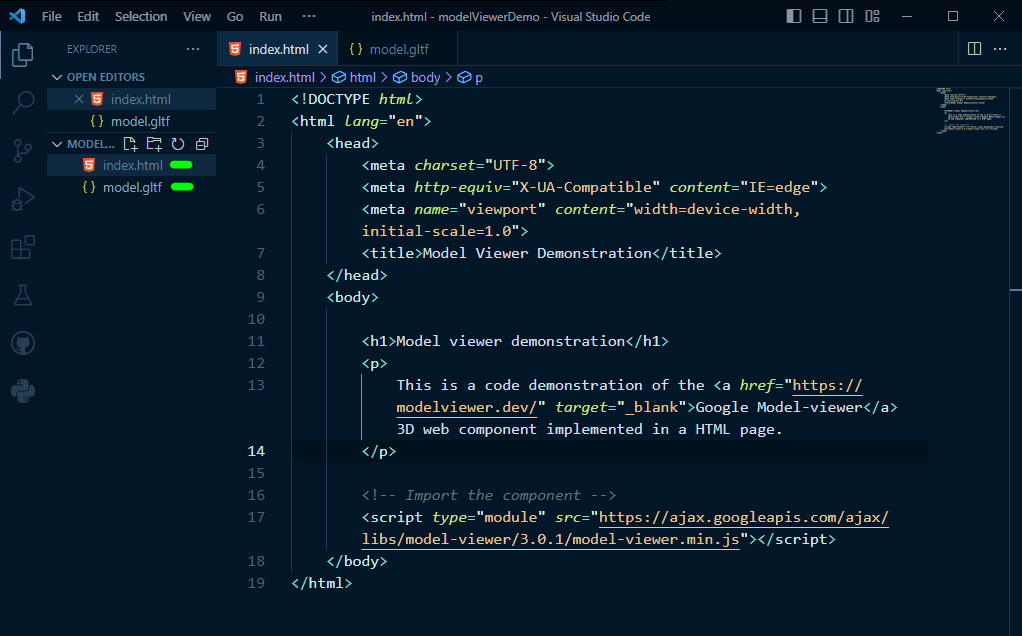
index.htmlpage with the following code. This includes the Script link to the Google model-viewer Library Hosting CDN.
<!DOCTYPE html>
<html lang="en">
    <head>
        <meta charset="UTF-8">
        <meta http-equiv="X-UA-Compatible" content="IE=edge">
        <meta name="viewport" content="width=device-width, initial-scale=1.0">
        <title>Model Viewer Demonstration</title>
    </head>
    <body>

        <h1>Model viewer demonstration</h1>
        <p>
            This is a code demonstration of the
            <a href="https://modelviewer.dev/" target="_blank">
            Google Model-viewer</a> 3D web component.
        </p>

        <!-- Import the component -->
        <script type="module" src="https://ajax.googleapis.com/ajax/libs/model-viewer/3.0.1/model-viewer.min.js"></script>
    </body>
</html>
- At this stage you should have the model, and the HTML both sitting in the root of your project. See this screenshot:
- Almost there, now we need to add the
model-viewerelement to our HTML. Add it just under the paragraph</p>close tag. Notice thesrcattribute is where we link our newly acquired gltf file:
<model-viewer
    auto-rotate
    camera-controls
    loading="eager"
    alt="cute little pupper"
    src="model.gltf"
>
</model-viewer>
- Preview your project locally!
As you can see, the <model-viewer> acts just like a HTML element does. It renders to the DOM as soon as the page loads, and inside the viewer is our GLTF asset of the cute pupper!
auto-rotate, camera-controls, and loading are custom attributes to the web component, and those allow us to physically interact with the Dog shown. And all of them are clearly chronicled in the documentation of the Model-viewer website.
- Using your mouse, left-click and hold on the Puppy and then drag your mouse. This will rotate the camera around the asset. Use scroll-wheel to zoom-in-out. And use right-click and hold to pan your camera to a new focal point.
- Our viewer is a little small though. We can use some CSS to resize it easily by enlarging it. Feel free to embed this directly into the HTML, or create a file CSS file and link it to the
index.htmldocument.
model-viewer {
    height: 60vh;
    width: 100%;
}
And with that, we are done. No more coding, just deployment. This is our finished code, complete with the GLTF model ➡ Repo. Feel free to clone or fork this repo.
- Deploy your project to github pages, and everything will still work. Or consider deploying to Vercel...and you guessed it, still fine.😉
To demonstrate, I've done both:
Well done, you've successfully created a 3D experience in the browser. Without the need to use Three.JS or similar, Blender to create custom assets, or bundlers to get your code ready for the web.
Go out there and create something, show me! Use the documentation for something a little more advanced than this. Comment below with your creations.
If you are looking to further your creative development career, and are looking to learn, then can I inspire you to look to Bruno Simon's Three.JS Journey, trust me you will not be disappointed.
